Note: Version 1.0z has been patched on Jul. 12, 2018.
Terminology
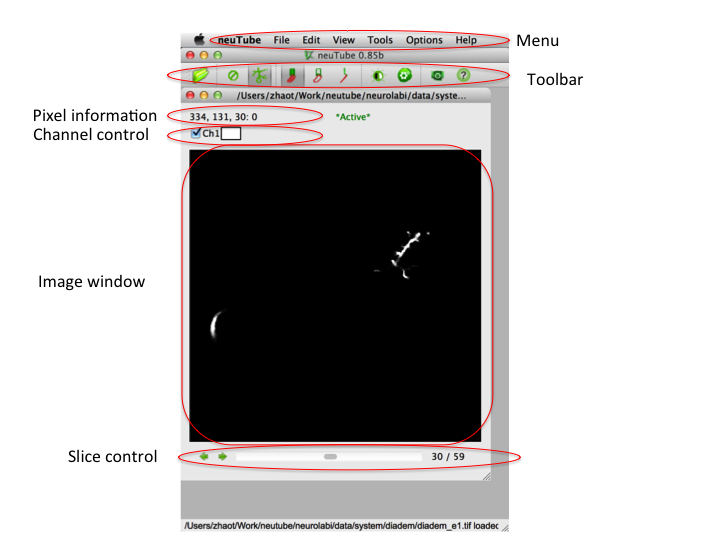
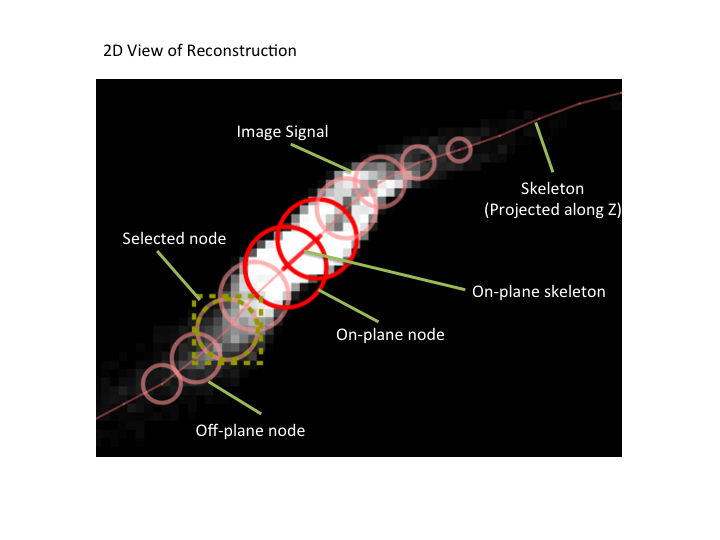
The structure of a neuron is modeled as a tree, which is composed of a set of nodes and the edges connecting the nodes. Each node is a ball in the 3D space and it’s size is specified by it’s radius. The edges form the skeleton of the neuron.This simple model is also defined by the commonly used SWC format. Therefore, we sometimes refer to a node as a neuron node or an SWC node. In neuTube, one neuron can have isolated nodes, which form multiple connected components. Creating a tree model from image data is called tracing. Since neuTube is mainly designed for tracing 3D images, an image often means a 3D image, which is also called a stack. neuTube provides both 2D visualization and 3D visualization of image data and neuron structures. A window of 2D visualization is called a 2D window and similarly, 3D visualization is shown in a 3D window. Editings in the 2D window and 3D window are called 2D editing and 3d editing respectively.
Main Menu
File
File → Open…
Open a file, which can be a TIFF or an SWC file.
File → Import → Image Sequence
Import a sequence of images. When a TIFF file is selected, the program will analyze the pattern of the file name and extract the base name and ending number. All TIFF files with the same base name will be loaded in the ascending order of the ending number.
File → Expand Current → SWC
Add an SWC file to the current document.
File → Expand Current → Mask
Add a mask to the current document.
File → Save Image/Stack
Save the current image/stack as a TIFF file.
File → Export → Mask
Export the current mask as a TIFF file.
Edit
Undo / Redo
neuTube supports unlimited undo/redo for most SWC editing operations.
View
View → Adjust → Brightness/Contrast
Activate the dialog of adjusting brightness and contrast of the current image. The adjustment applies to all slices.
View → Object Mode
Set the object view mode, which is for SWC only in the current version.
View → Object Mode → Dense
Show objects in the dense mode to show most details.
View → Object Mode → Sparse
Show objects in the sparse mode.
View → Object Mode → Skeleton
Show objects in the skeleton mode. Only the skeletons are shown if they are available.
View → Autosaved
Show all files saved automatically. This is to recover reconstruction after crash.
View → Information
Show information of the current document.
Tools
Tools → Process → Extract Channel
Extract a channel from a multi-channel image.
Tools → Process → Invert
Invert the color of the current image.
Tools → Manage Objects
Show the list of objects in the current document.
User Interaction
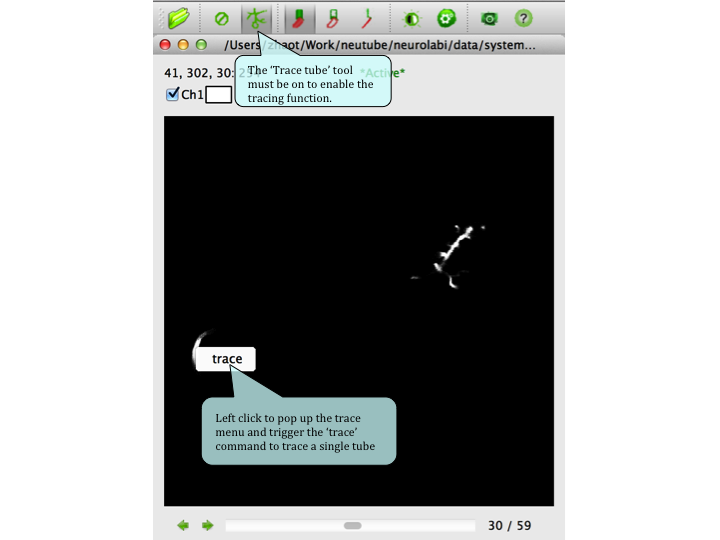
Trace
Editing
Start:
Select any node(s), and then right click to bring up the context menu:

Select Nodes
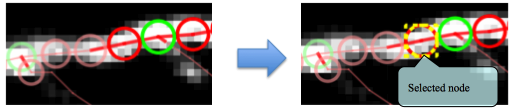
The simplest way to select a node is clicking the node with left mouse button. Once a node is selected, its display pattern is changed to reflect the selection status:
There are also ways to select multiple nodes:
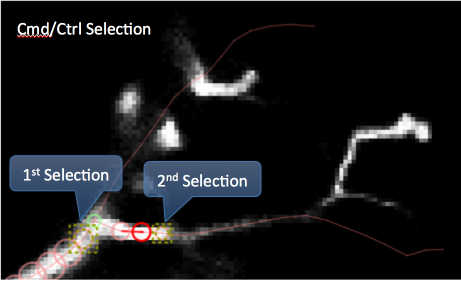
Mouse click with Cmd/Ctrl button pressed: select a node without deselecting the nodes that have already been selected. This operation becomes deselection if the clicked node is a selected one before the click.
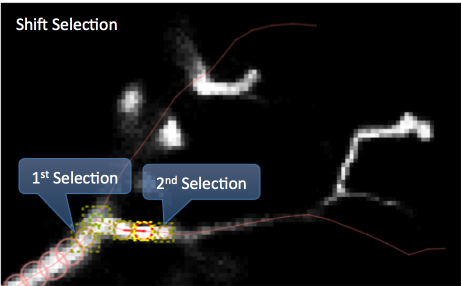
Mouse click with Shift button pressed: select the path from the currently selected node(s) to the newly selected node.
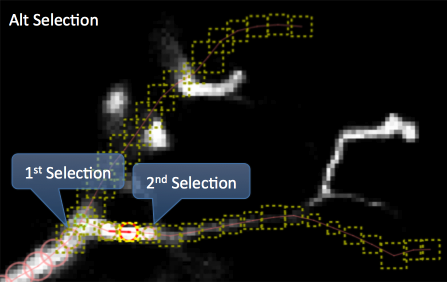
Mouse click with Alt button pressed: select all nodes growing from the clicked node until meeting other selected nodes.
The hotkey of Cmd/Ctrl + A is for selecting all nodes.
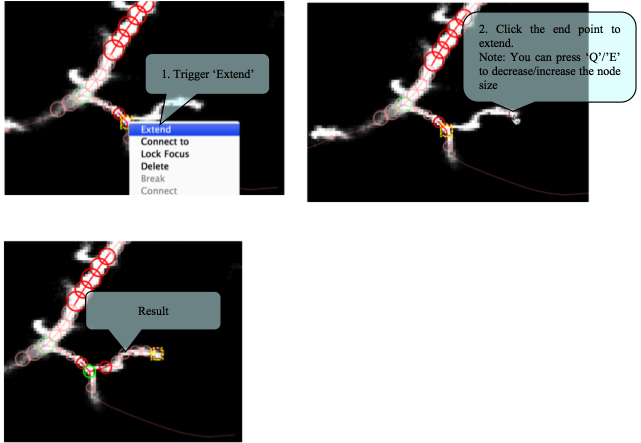
Extend
Connect
neuTube provides several ways of connecting nodes:
Select a node and then connect to another

Select multiple nodes and connect
Tip: the shortcut key of this operation is ‘C’.
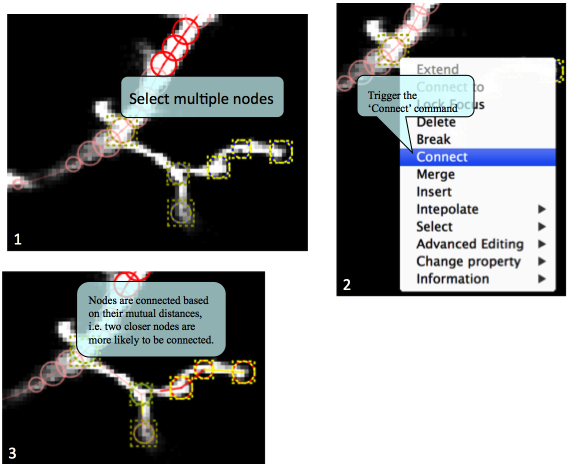
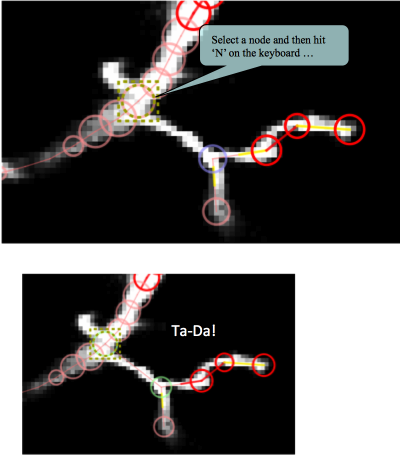
Connect to the closest node
Change Position
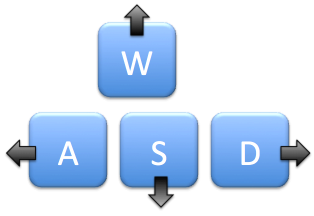
Change X-Y position
The four keys, A, W, S, and D, are used to change the node position on the X-Y plane:
You can also use the mouse to move the selected nodes. Trigger ‘Move Selected (Shift+Mouse)’ in the context menu and you’ll see the cursor is changed to a hand shape. Hold the ‘Shift’ key and press the left button to move the selected nodes around.
Change Z position
Changing the Z position of a node is a little more complicated:
- Select one or more nodes to change Z
- Move the image plane to the target position. Any selected node will move its center to the displayed plane.
- Trigger the ‘Move to Current Plane’ command in the context menu

The shortcut key is ‘F’.
Change Size
Changing the size of a node is linked to two keys: ‘Q’ and ‘E’.
After selecting one or more nodes, you can hit ‘Q’ to make them smaller or ‘E’ to make them bigger. These two keys are selected because they are close to the position keys so that the user can change position or size without moving hands.
Remove
Delete nodes
Select nodes to delete, then hit ‘Del’ or ‘X’ key. Another way is to use the ‘Delete’ command in the context menu.
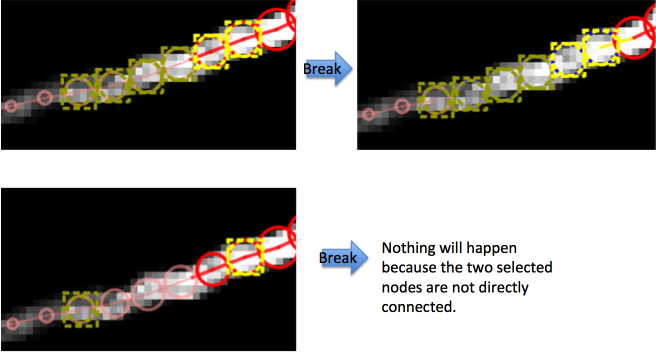
Remove edges
Select the nodes forming the edges to delete, then hit the ‘B’ key. The corresponding command in the context menu is ‘Break’.
Note that the nodes must be directly connected:
3D Editing
Most editing functions in the 3D window are similar to those in the 2D window.
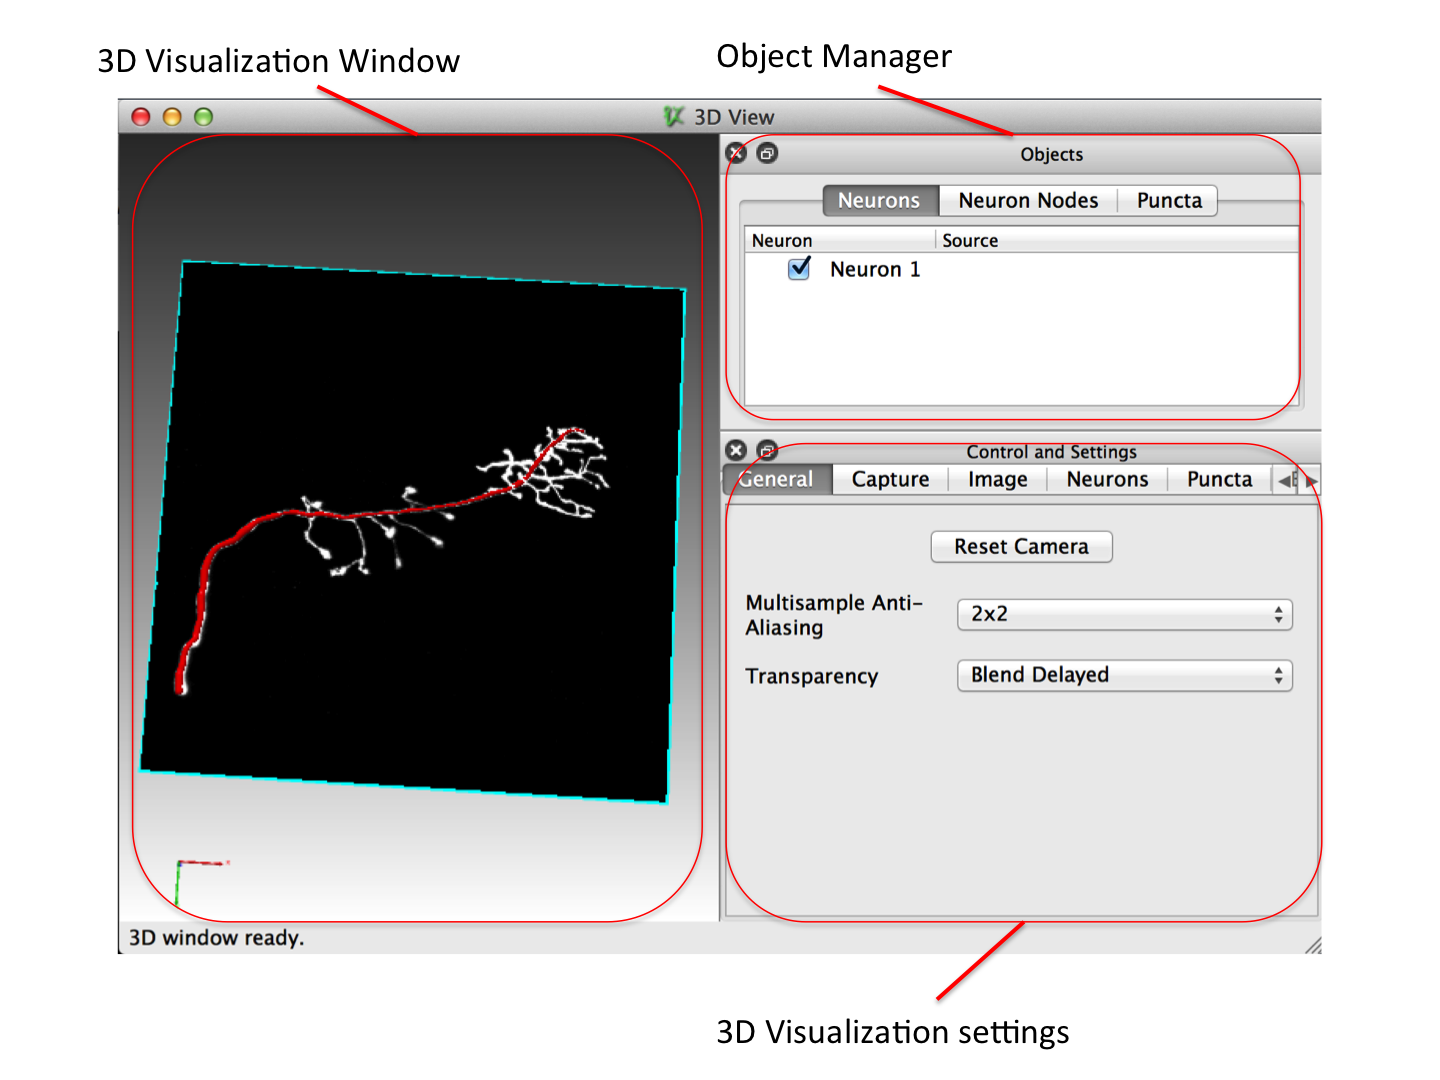
Note: The interface is from v0.93+, which has a little different control layout compared to older versions. In older versions, ‘Neurons’ was ‘Swcs’, ‘Neuron Nodes’ was ‘Swc Nodes’, ‘Image’ was ‘Volume’ and ‘General’ was ‘Utils’.
Special functions in 3D:
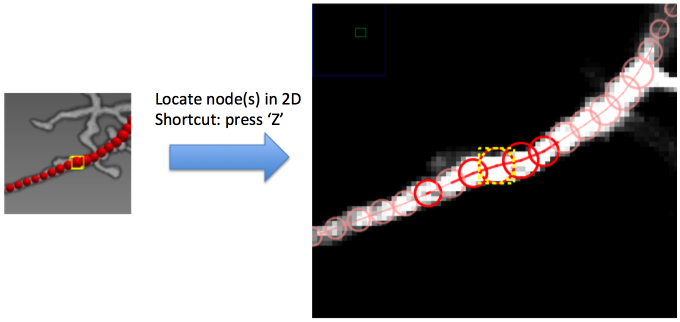
Locate node(s) in 2D
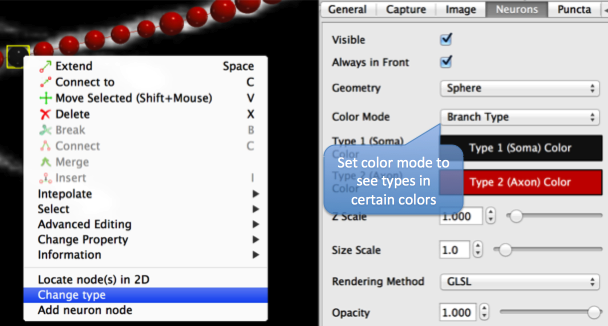
Change Node Type in 3D
Hot Keys
(Cmd refered to as Ctrl for PC)
General
| Cmd+A | Select all SWC nodes |
| Cmd+Z | Undo |
| Cmd+Shift+Z | Redo |
| Backspace/Delete | Delete selected objects |
| Space | Extend |
| C | Connect selected SWC nodes |
| N | Connect to the nearest SWC nodes (only work for a single selected node) |
| B | Break SWC node connections |
| V | Enable moving selected objects with mouse |
2D Window
| G | Turn on adding SWC node |
| [Shift] A | Move image or swc node to left. Hold Shift for fast movement. |
| [Shift] D | Move image or swc node to right |
| [Shift] W | Move image or swc node up |
| [Shift] S | Move image or swc node down |
| = / Up_Arrow | Zoom in |
| – / Down_Arrow | Zoom out |
| Left_Arrow | Decrease Z position |
| Right_Arrow | Increase Z position |
| < / Q | Decrease radius |
| > / E | Increase radius |
| F | Change focus of select nodes to the current plane |
3D Window
| = | Zoom in |
| – | Zoom out |
| All Arrows | Rotate |
| [Shift] Arrows | Move |
| < | Decrease radius |
| > | Increase radius |
| Cmd + S | Save SWC |
| Cmd + Plus | Increase SWC Size Scale |
| Cmd + Minus | Decrease SWC Size Scale |
| Cmd + M | Change SWC Display Mode |
| Z | Locate selected nodes in 2D |
Vaa3D Plugin
neuTube can be integrated into Vaa3D as a plugin. You can find it in the Vaa3d menu at ‘Plug-In > neuron_tracing > neutube’